In the world of Flutter, in the past few months, there was a lot of talk about Impeller. Impeller stable release here, Impeller preview release there…
But only a few people talk about the underlying mechanics of Impeller.
But it’s important to know how Impeller works!
Why you ask?
Because when knowing how Impeller works, we can make informed decisions on how to optimize our app performance — one of the most crucial metrics in app development!
That’s why, today, we are going to learn the following things:
-
What is a rendering engine?
-
How does a rendering engine work in general?
-
The Problem With Skia
-
What’s so special about Impeller
-
Deep-Dive into the Impeller Architecture
Let’s get started!
What is a rendering engine?
Rendering engines are software that turn abstract instructions from an application’s code into visuals on your screen. They’re behind the graphics and user interfaces of mobile apps, video games, and websites.
This software works behind the scenes, converting code into pixels, colors, shapes, and animations. It’s what enables developers to create the interfaces and experiences users interact with on their devices.
At its core, a rendering engine is responsible for drawing the user interface of an application. This involves a complex process of interpreting the app’s code, which defines the layout, appearance, and behavior of various elements, and then rendering this information as images that can be displayed on a screen. The engine must handle a variety of tasks, including layout calculations, texture mapping, and animations, ensuring that everything looks as it should, regardless of the device’s screen size or resolution.
The importance of a rendering engine cannot be overstated. It directly impacts the performance and appearance of an application. A well-optimized engine can render graphics quickly and efficiently, leading to smooth animations and responsive interfaces. This makes the user’s experience more enjoyable and can significantly contribute to the success of an application. Consequently, developers often have to choose the right rendering engine that fits the needs of their project, balancing factors like speed, quality, and compatibility with different devices and platforms.
How does a rendering engine work in general?
A rendering engine follows a systematic process, starting with interpreting high-level instructions defined by developers, such as the layout, colors, and animations of an application’s user interface. These instructions are then broken down into smaller tasks like displaying a button here, a text field there, or animating an object moving across the screen.
Keep in mind that we will take a closer look at how these processes work further down the article, this is just a general overview of every rendering engine:
The Layout Process
Once the rendering engine has a clear understanding of the tasks at hand, the rendering engine starts the layout process. This involves calculating where each visual element should be placed on the screen, how big it should be, and how it interacts with other elements. This step is crucial for ensuring that the app looks good on various devices, with different screen sizes and resolutions.
The Drawing Process
After laying out the elements, the engine moves on to drawing them. This involves translating the layout and visual properties into actual pixels on the screen, a process known as rasterization. It determines the color of each pixel, based on the elements that need to be displayed.
Final Touches
Lastly, the rendering engine applies any final touches needed to make the visuals come to life. This includes applying textures, handling light effects, and rendering animations. For animations, the engine calculates the movement of objects frame by frame, ensuring smooth transitions and interactions. Throughout this entire process, the engine continuously updates the screen, redrawing the visuals as needed to reflect any changes in the app’s state or user interactions.
The Problem With Skia
Skia is the previously used rendering engine in Flutter. In general, it’s not a bad engine. In fact, it’s a very good general-purpose engine.
A quick detour of what Skia is
Skia is a 2D graphics library that’s open-source. It has common APIs that work on different hardware and software platforms. Skia is used for graphics in different products like Google Chrome and Chrome OS, Android, Mozilla Firefox, and Firefox OS. Skia is designed to be powerful and versatile. It can render high-quality graphics quickly and efficiently. Skia is popular among developers because it’s reliable and well-supported. However, for Flutter applications, Skia’s general-purpose design has limitations. This led to the development of Impeller, a Flutter-focused rendering engine.
The Problems of a general-purpose rendering engine in Flutter
Skia, as a general-purpose 2D graphics library, has some difficulties when it comes to meeting the specific needs of Flutter. Although Skia is a robust and versatile library that works well for many applications, it is not fully optimized for the high-performance requirements of Flutter. The problem is that Skia comes with many features that exceed the requirements of Flutter, which can cause unnecessary overhead and result in slower rendering times. This can be a problem for Flutter applications, especially when it comes to animations and transitions that require precise and efficient rendering for a smooth user experience.
Moreover, Skia’s broad approach to rendering tasks means it is not finely tuned for Flutter’s specific architecture. This lack of optimization becomes evident in demanding scenarios, such as complex animations and transitions, where Flutter apps require precise and efficient rendering to avoid jank or stuttering. The general-purpose nature of Skia, therefore, can introduce performance bottlenecks, detracting from the responsiveness and fluidity that users expect from modern applications.
Additionally, as Flutter developers push the boundaries of what’s possible with the framework, creating more complex and dynamic user interfaces, the limitations of Skia’s one-size-fits-all model become increasingly apparent. These challenges underscore the need for a rendering engine that is more closely tailored to the unique requirements and architecture of Flutter, ensuring that applications can leverage the full potential of the framework without being hindered by the constraints of a general-purpose rendering engine.
What’s so special about Impeller
Impeller is a rendering engine that was created specifically for Flutter applications. Unlike Skia, Impeller isn’t a graphics library for general use. Instead, it’s designed to optimize the rendering process for Flutter’s architecture. This specialization allows Impeller to focus solely on features and optimizations that enhance Flutter app performance. The primary goal of Impeller is to ensure that Flutter apps run smoothly, eliminating any jank or stuttering that could detract from the user experience.
One of the standout features of Impeller is its approach to rendering. Impeller is built to leverage the full capabilities of modern GPUs (Graphics Processing Units) more efficiently than Skia. This means that animations, transitions, and complex UI elements can be rendered with greater speed and less effort from the device’s hardware. The engine uses advanced techniques like tessellation and shader compilation to break down and render graphics in a way that aligns perfectly with how Flutter apps are constructed. By doing so, Impeller significantly reduces the workload on the device, leading to faster frame rates and smoother animations.
Impeller also introduces an innovative architecture that streamlines the rendering process. This architecture is layered, which allows each component of the engine to perform its specific task with maximum efficiency. At the heart of this system is a focus on minimizing the steps required to translate Flutter’s widget and render object trees into pixels on the screen. By optimizing the path from code to visual output, Impeller ensures that even the most graphic-intensive Flutter apps can maintain high performance and responsiveness.
Another key advantage of Impeller is its handling of shaders, small programs that run on the GPU to control the rendering of graphics. Unlike Skia, which compiles shaders on the fly and can cause delays, Impeller compiles most of its shaders ahead of time. This pre-compilation significantly reduces the chance of experiencing jank during animations, as the GPU doesn’t have to pause to compile shaders while rendering frames. For Flutter developers, this means that their apps can achieve consistent, high frame rates without the unpredictability of runtime shader compilation.
Lastly, Impeller tries to address common rendering challenges such as anti-aliasing and clipping. It uses efficient techniques to ensure that edges are smooth and clip operations are fast, without compromising on quality or performance. Impeller’s attention to detail means that Flutter apps can look better and feel more natural and fluid to interact with. It sets a new standard for app performance and visual quality by providing a rendering engine that truly understands and addresses the platform’s needs.
Deep-Dive into the Impeller Architecture
You now already have a pretty good understanding of rendering engines and what’s so special about Impeller. Now we want to take a deep look into how Impeller actually works. We are going to take a look at the different layers, rendering pipelines, and shader compilations as well as some other optimizations for Flutter.
The Layered Approach
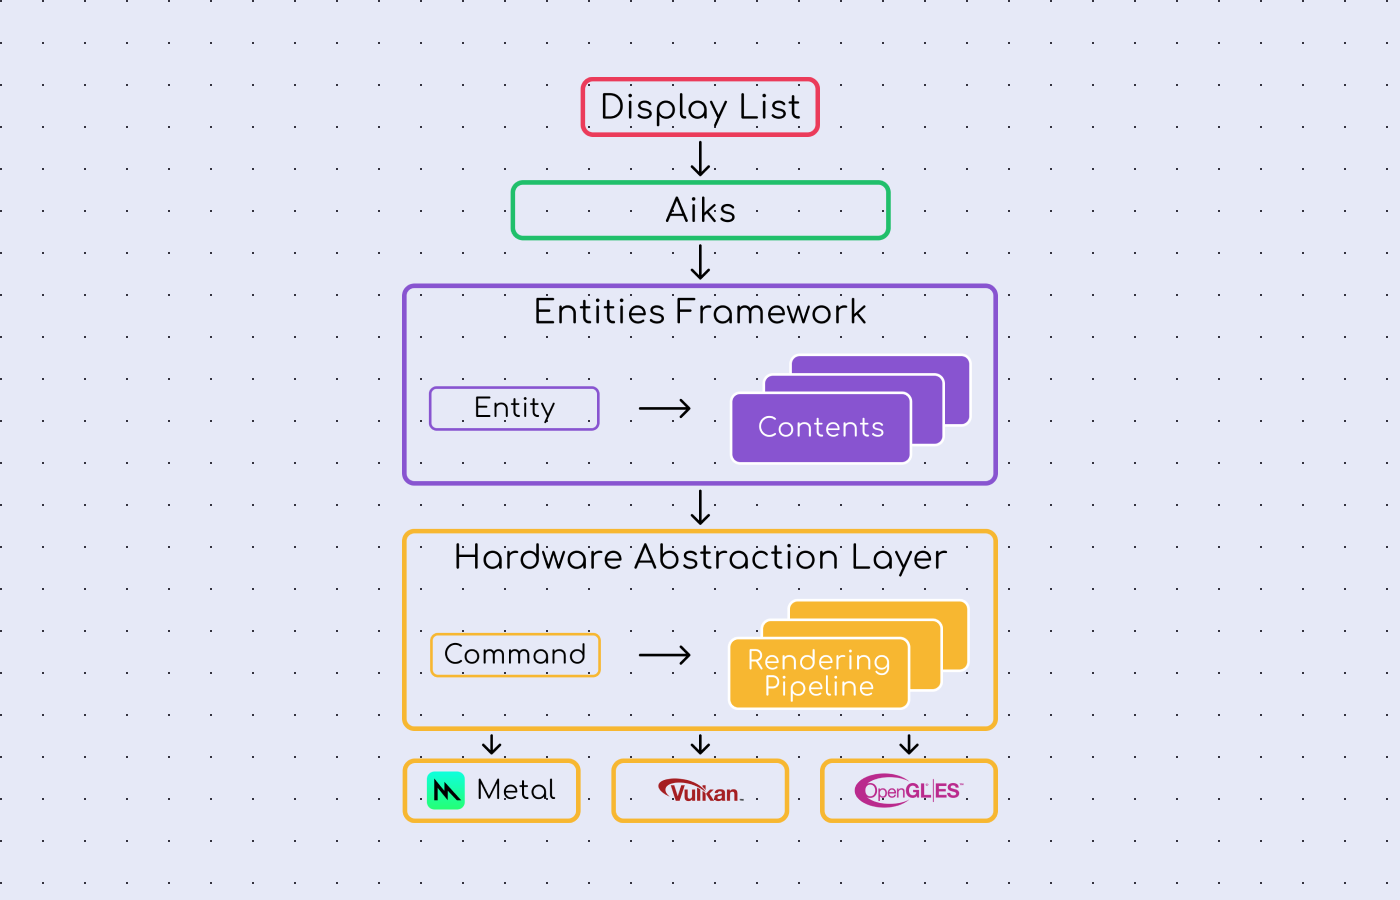
Impeller’s design is structured in layers, with each layer building upon the one below it to perform a specialized function. This design makes the engine more efficient and easier to maintain and update because it separates different concerns. The hierarchy of the layers keeps the design organized and allows for a clear understanding of its functions.
Aiks — The High-Level Interface
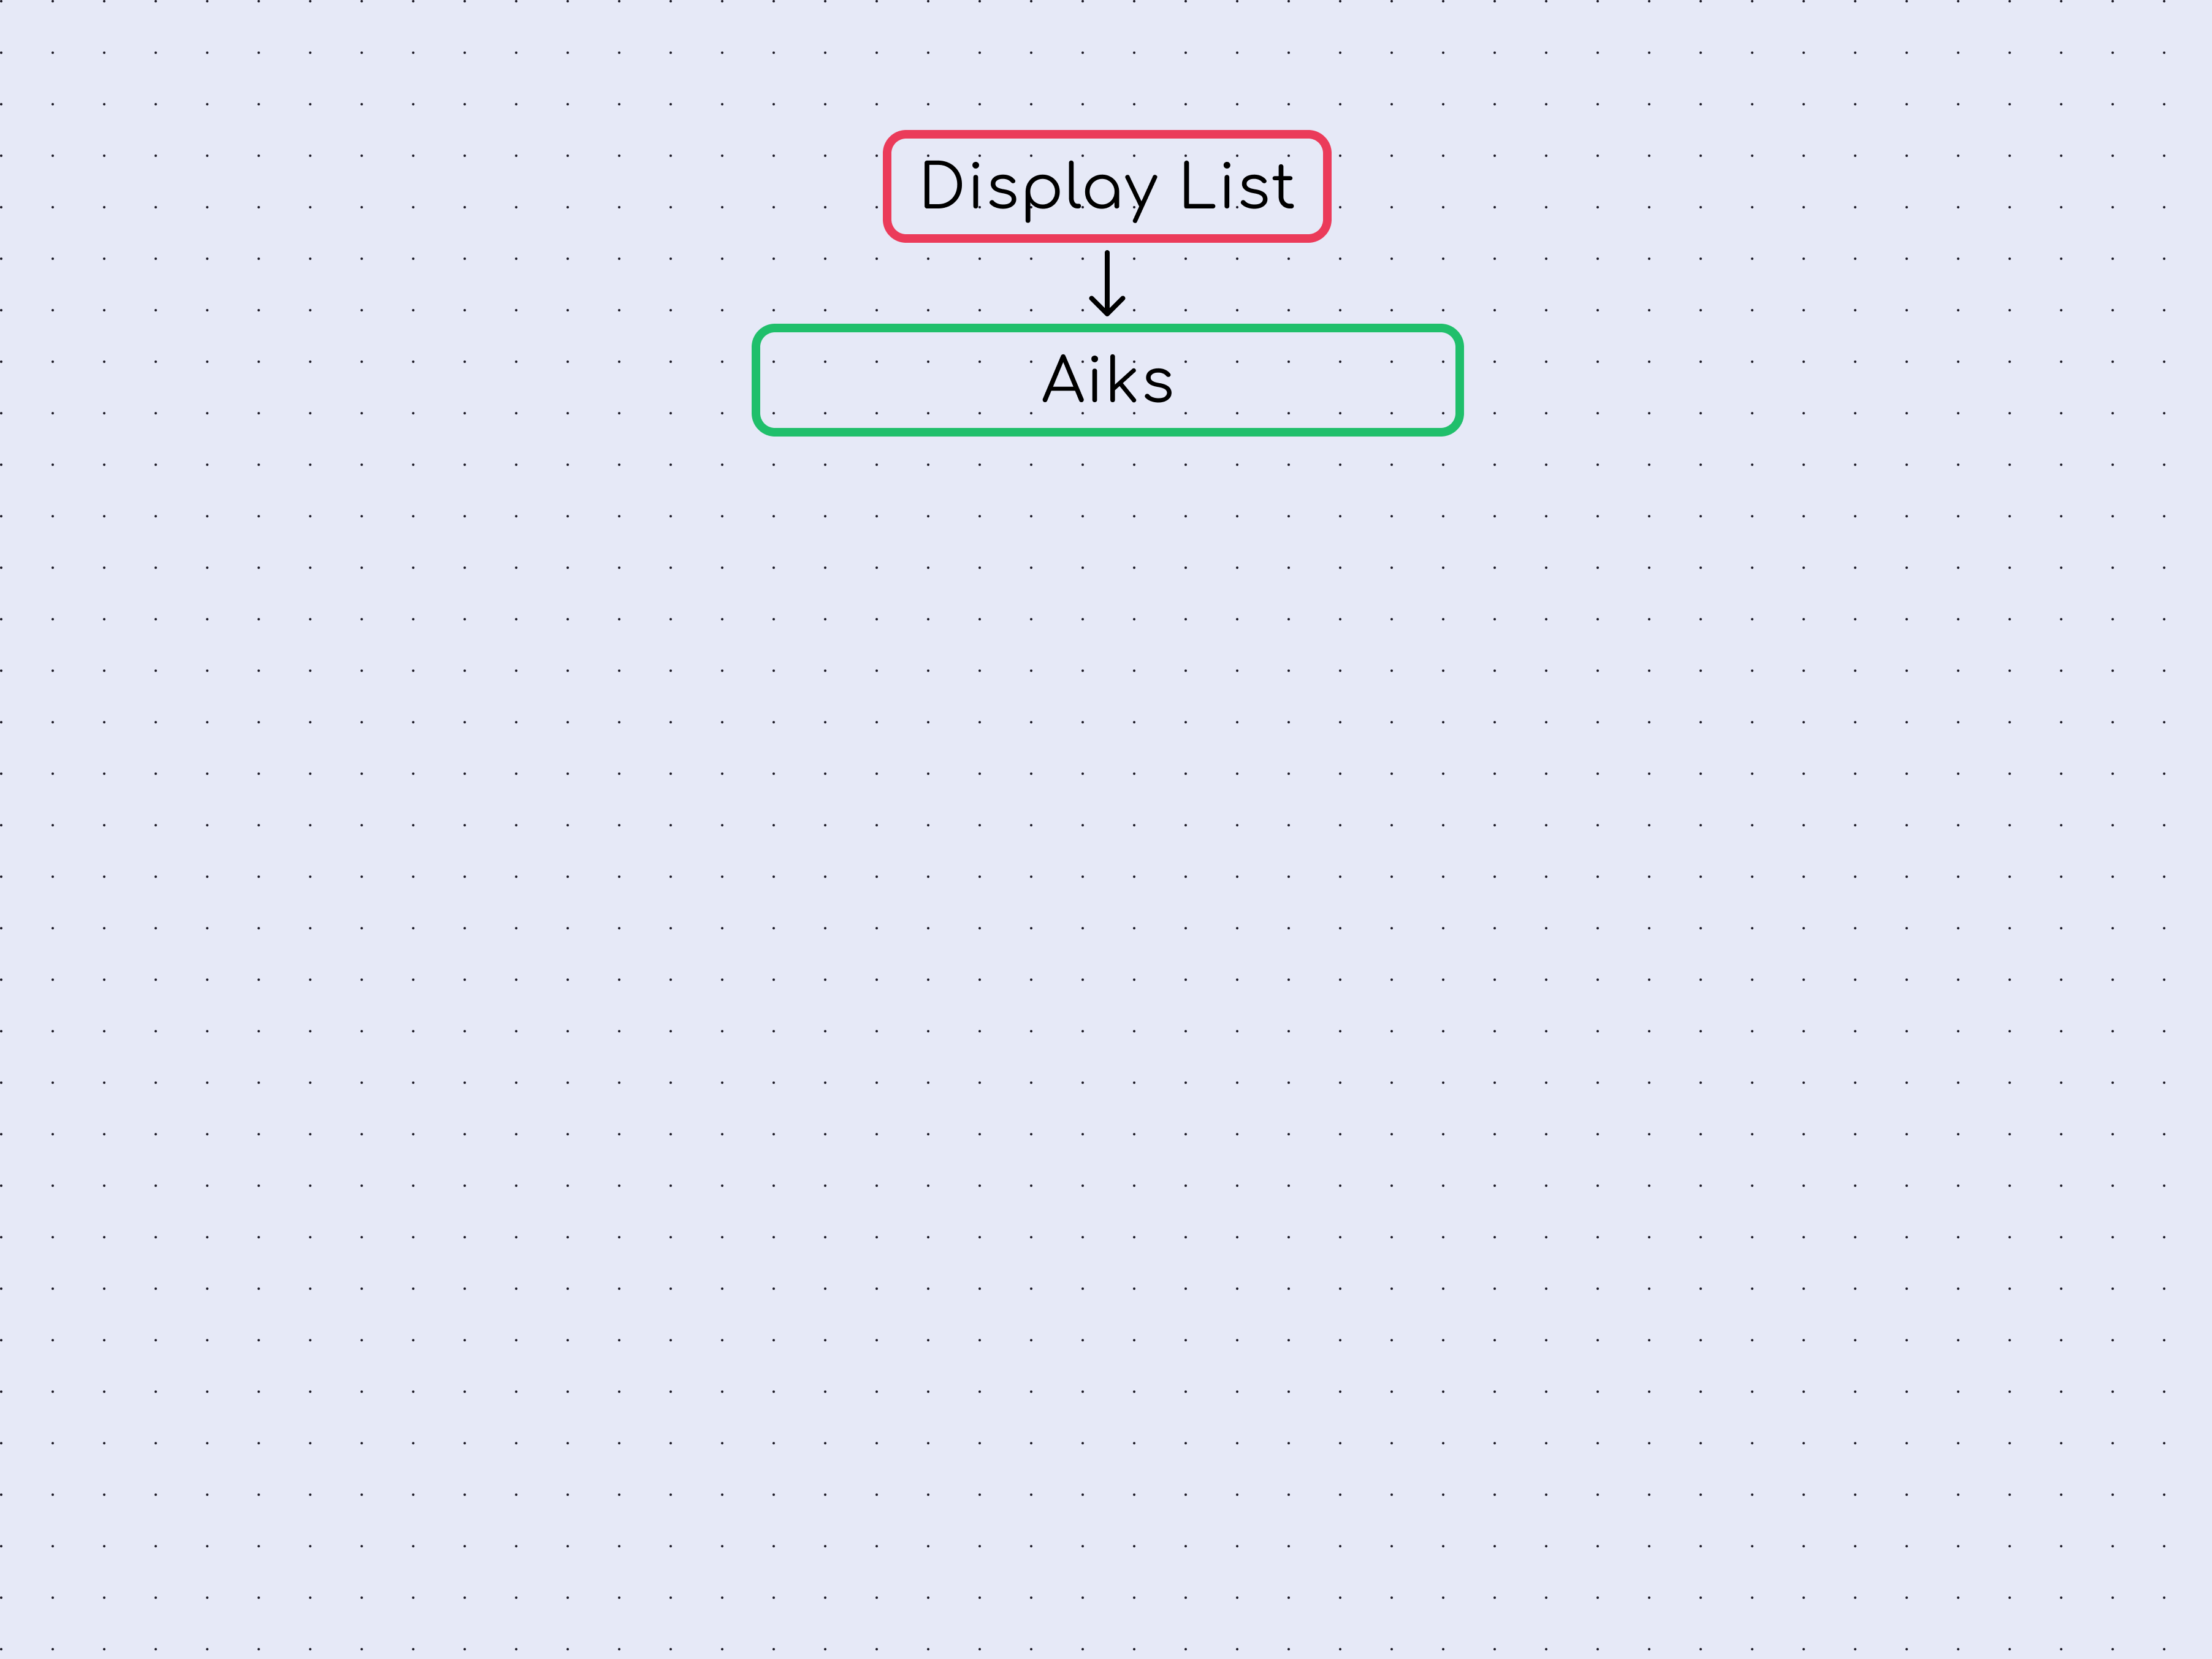
At the top of Impeller’s architecture is Aiks, a layer that serves as the high-level interface for drawing operations.
It accepts commands from the Flutter framework, such as drawing paths or images, and translates these into a more refined set of operations called “Entities”. This is where the next layer comes in.
Entities Framework
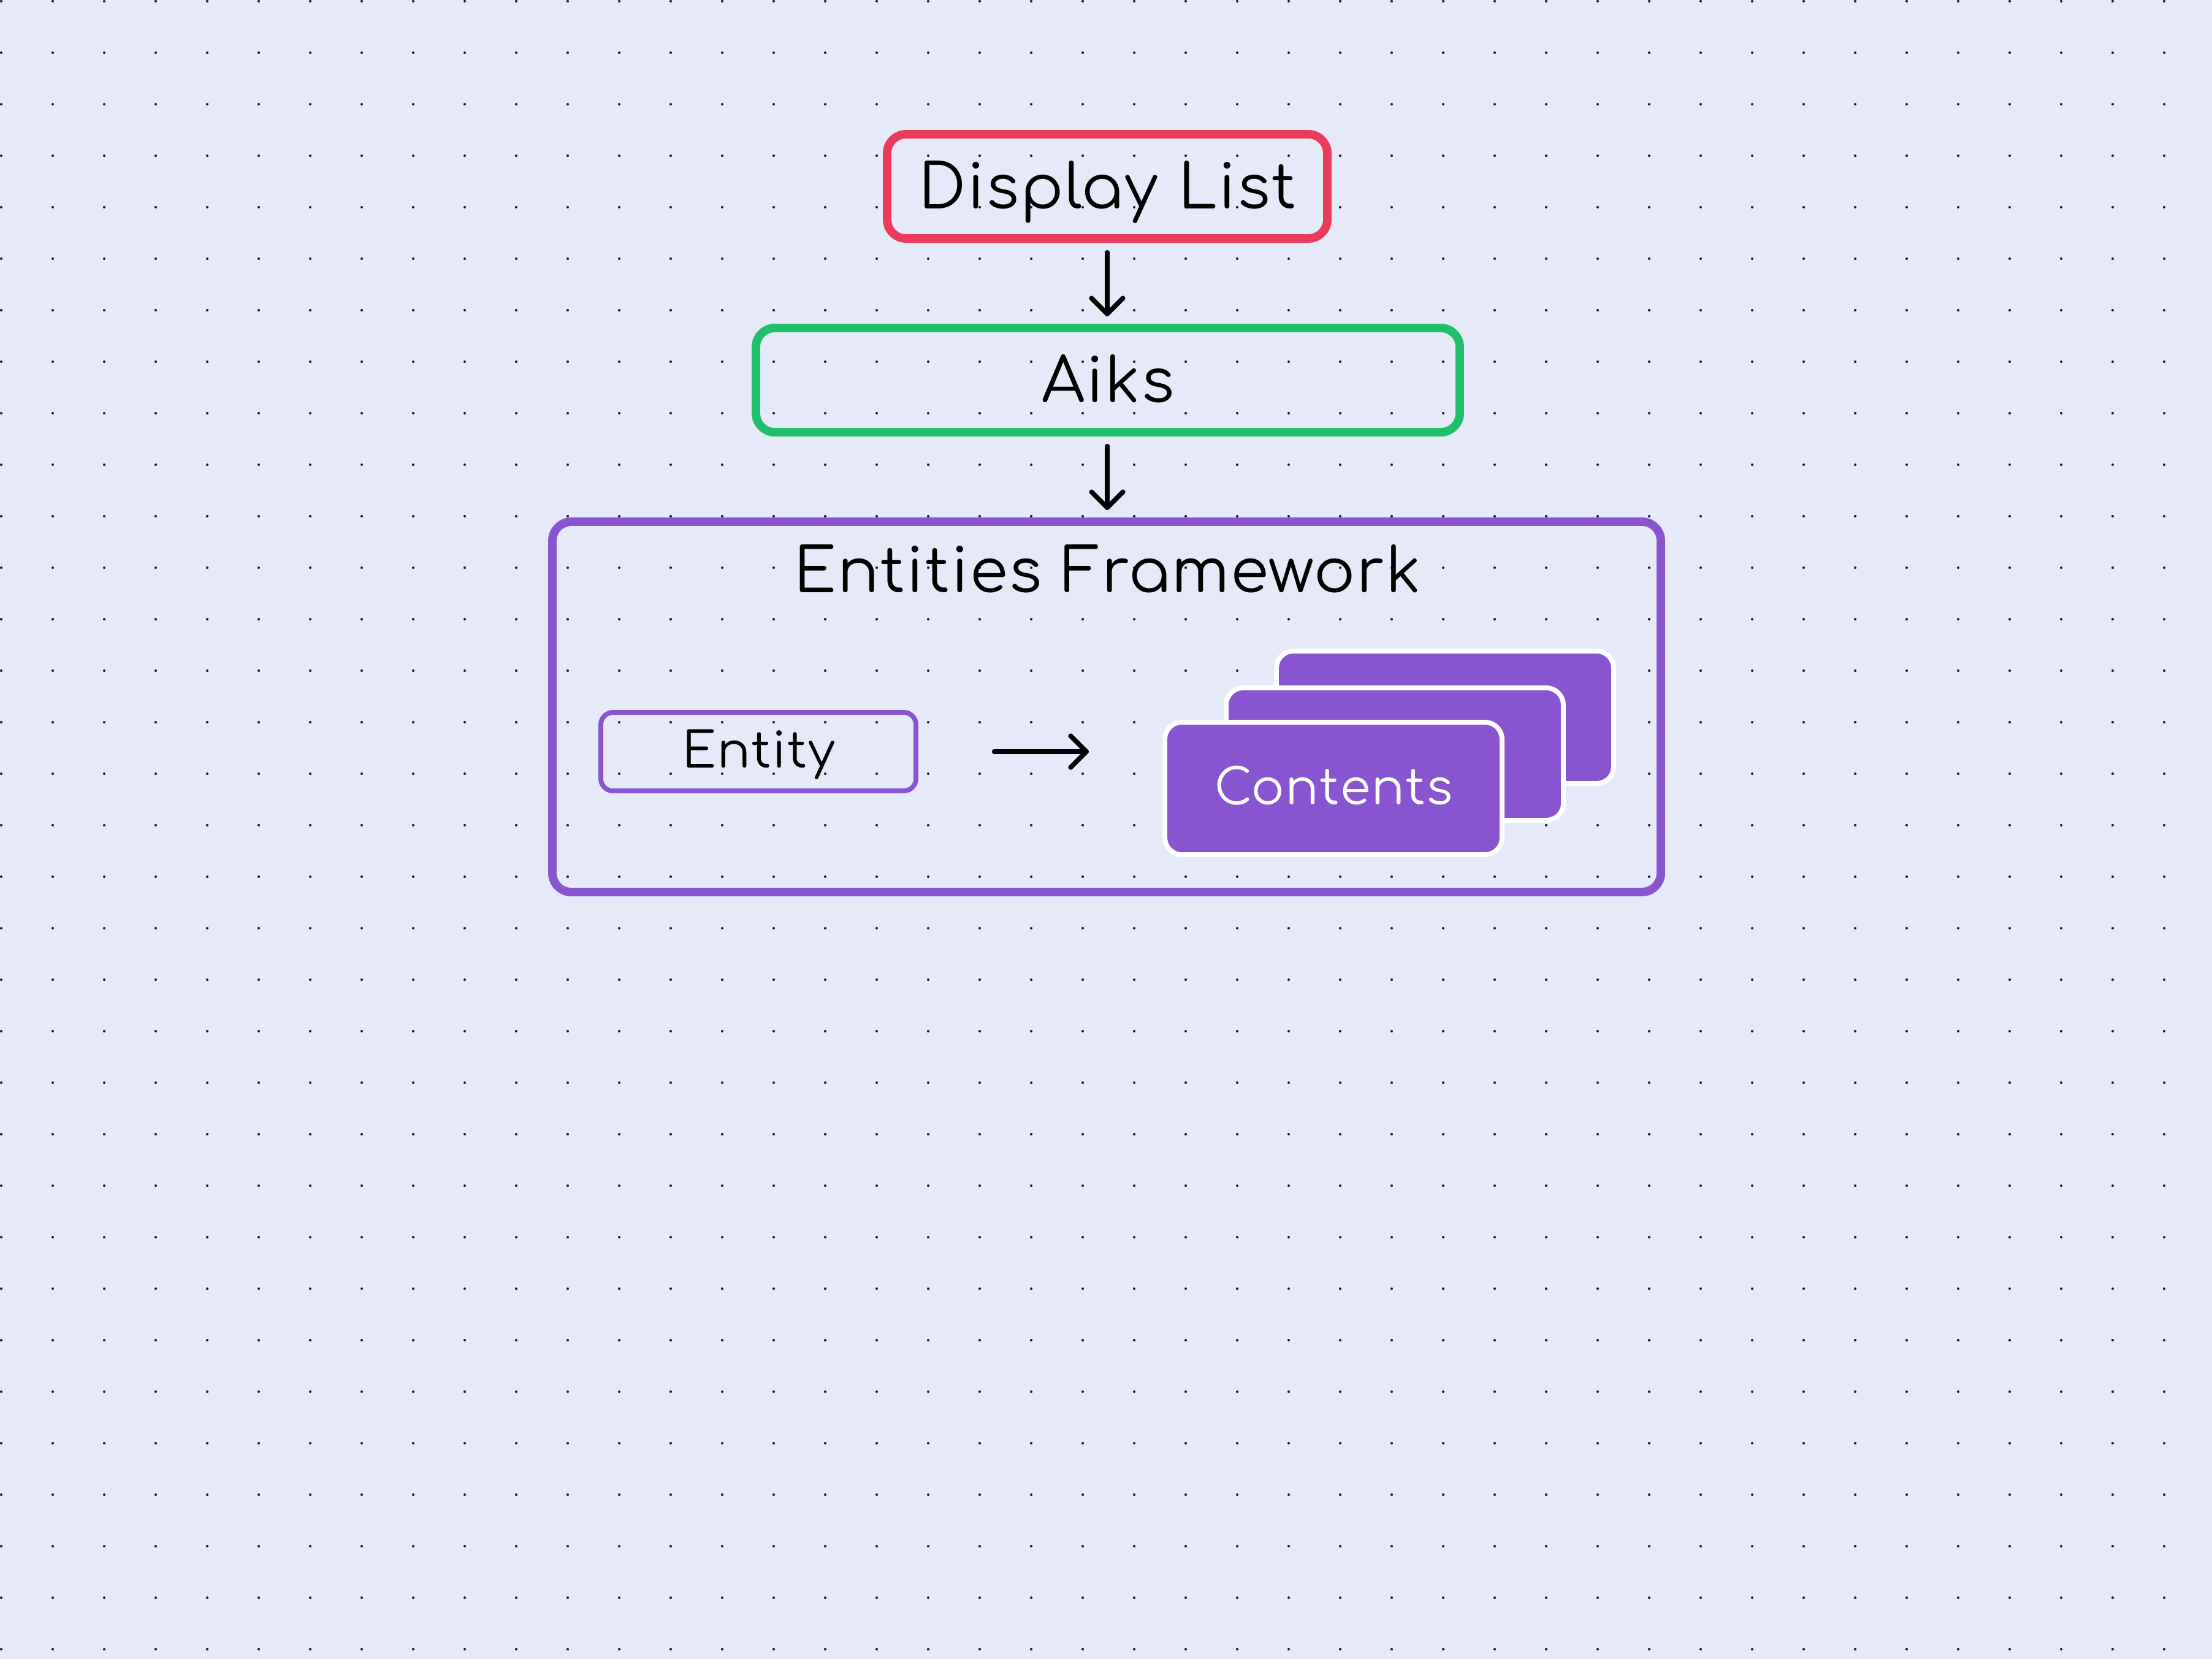
Beneath Aiks lies the Entities Framework, a core component of Impeller’s architecture. When Aiks processes a command, it generates entities, self-contained units of rendering instructions that include all the necessary information for drawing a specific element.
Each entity carries with it properties such as transformation matrices (encoding position, rotation, scale), along with a ‘content object’ that holds the GPU instructions needed for rendering.
These content objects are very flexible and can manage many visual parts like solid colors, images, gradients, and text. Aiks can use different versions of these objects, each made to create the same thing in various ways. This lets Aiks pick the best way to show visuals in your Flutter app, making sure it runs smoothly.
Now we are still not able to communicate to the GPU itself. This is quite a complex task because the engine needs to talk to many different APIs, like Metal on iOS or Vulkan on Android. That’s why there is another layer for this in Impeller, the Hardware Abstraction Layer:
Hardware Abstraction Layer
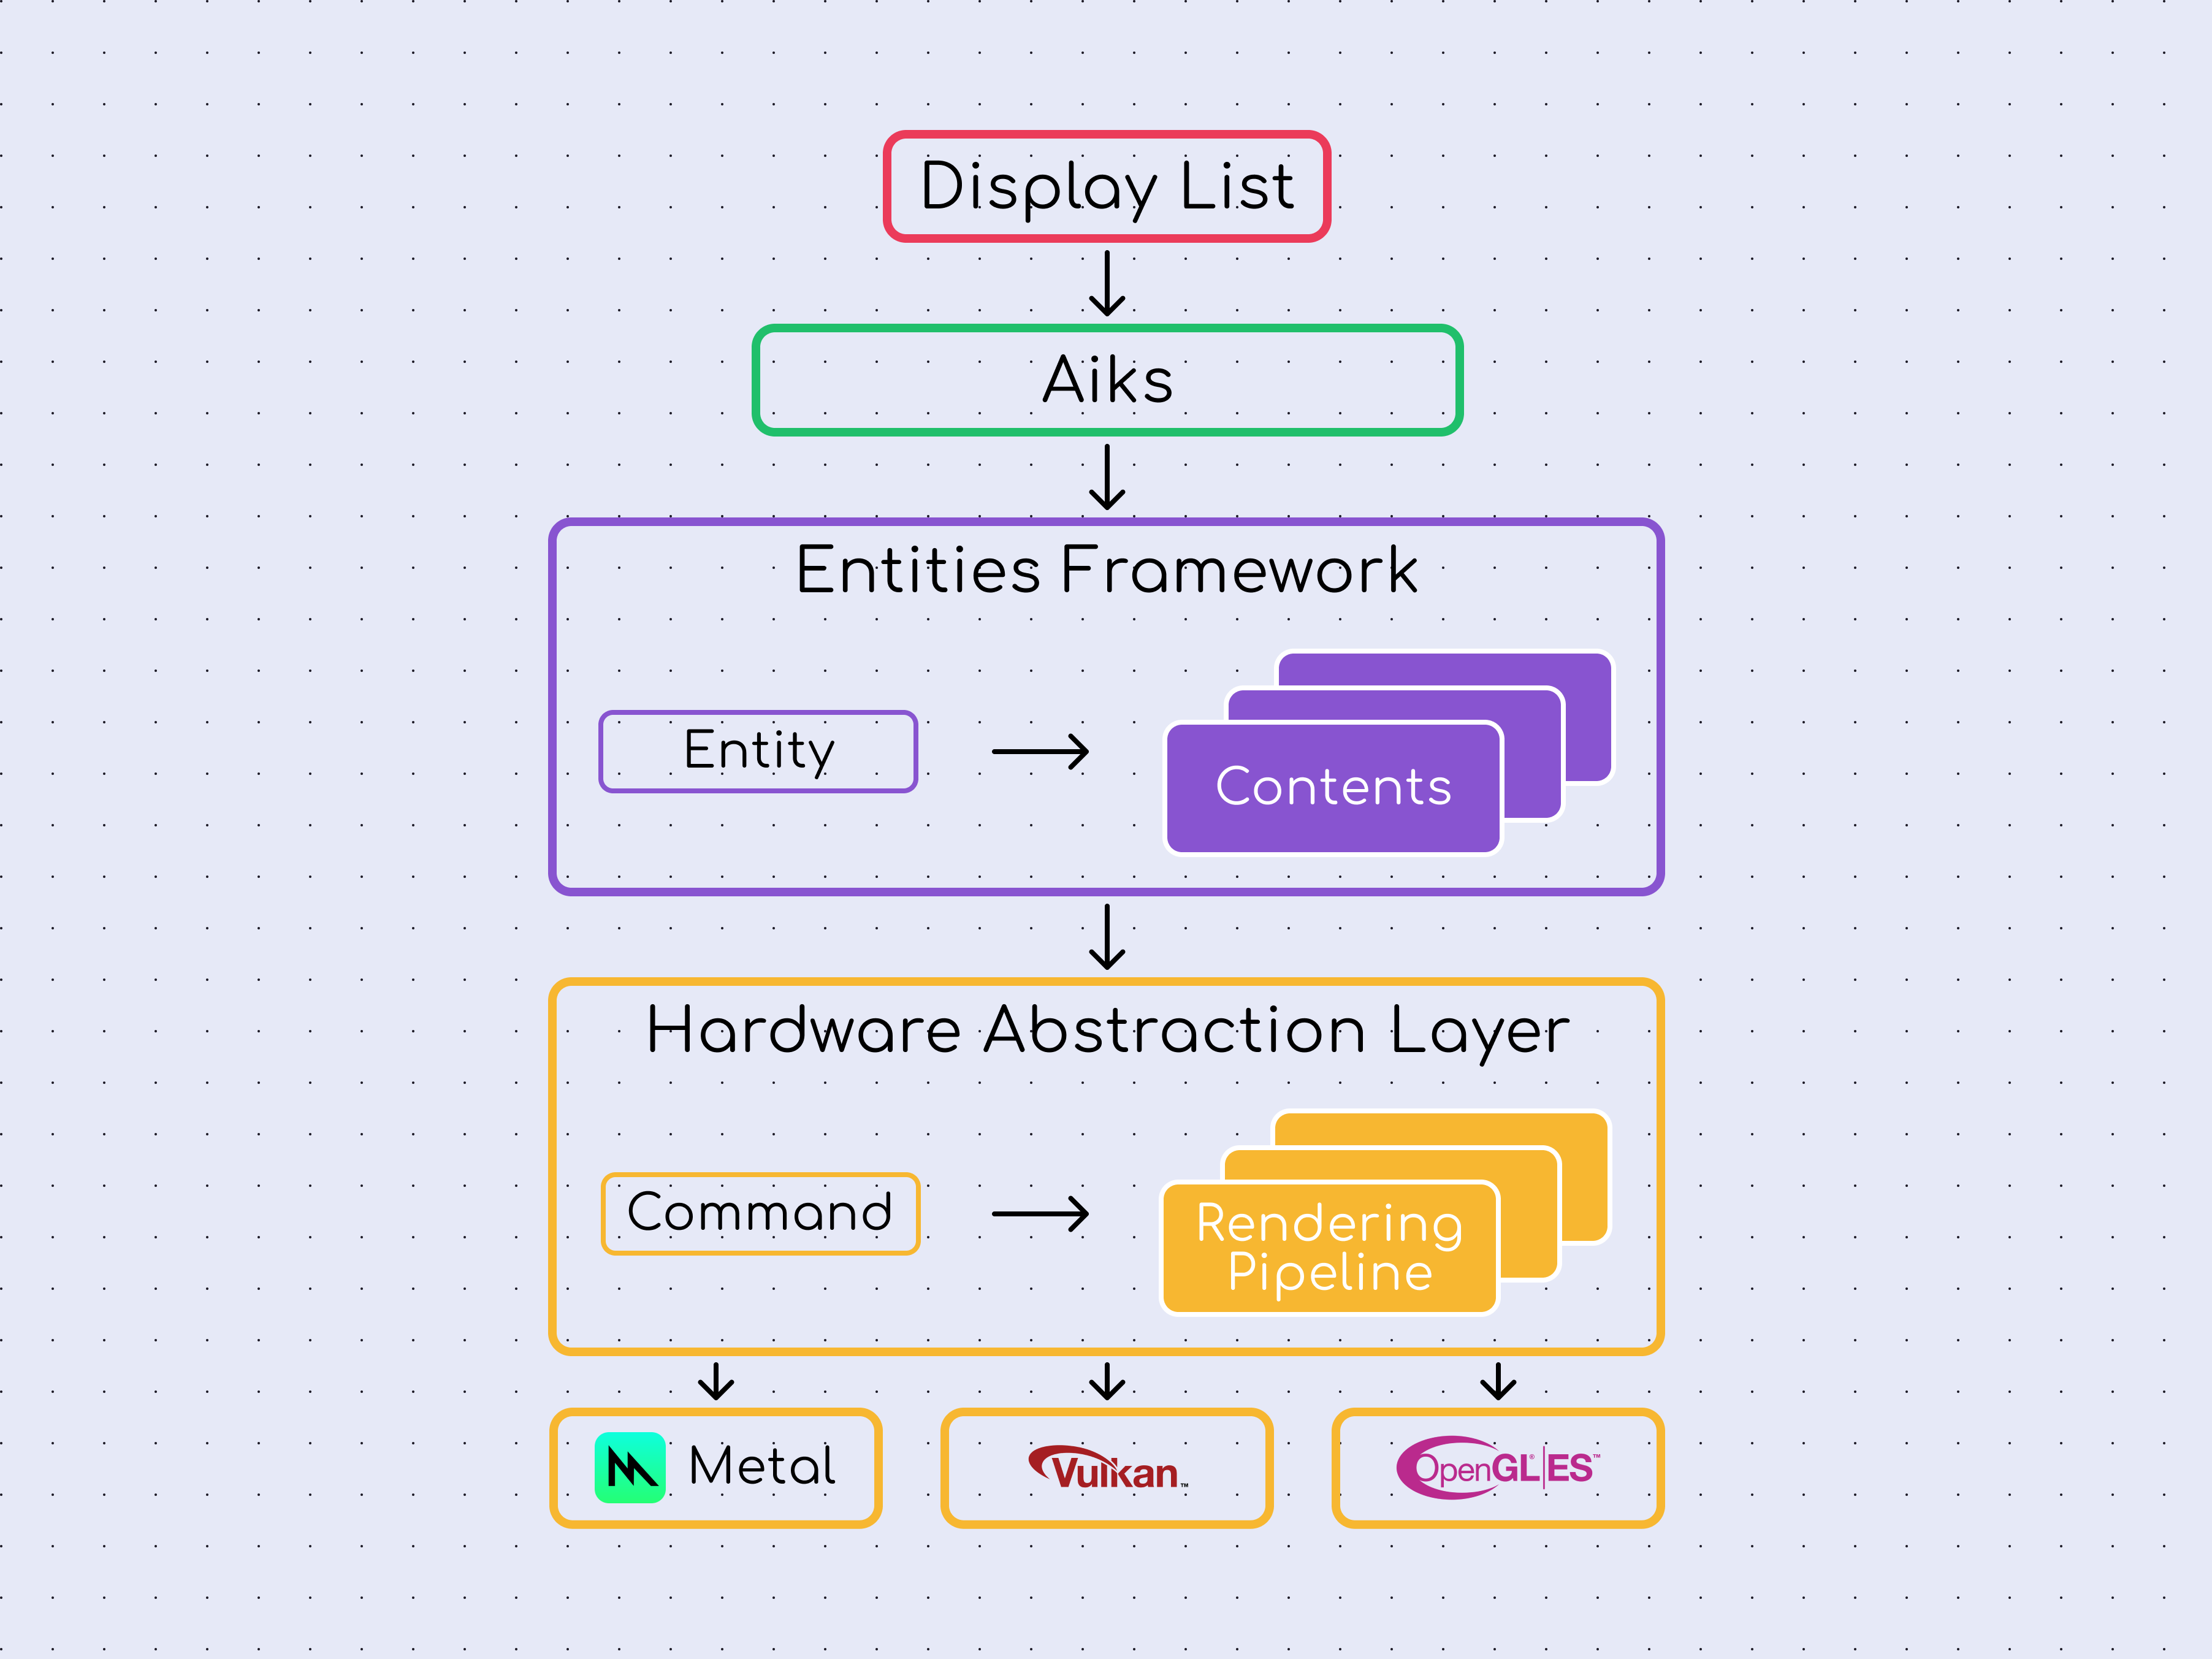
The Hardware Abstraction Layer (HAL) forms the foundation of Impeller’s architecture. It provides a uniform interface to the underlying graphics hardware, abstracting away the specifics of different graphics APIs like Metal for iOS and Vulkan for Android. This layer ensures that Impeller can operate across a wide range of devices and platforms without modification, making cross-platform compatibility possible. It translates the high-level rendering commands into low-level GPU instructions, acting as the bridge between Impeller’s rendering logic and the device’s graphics hardware.
Rendering Pipelines and Shader Compilation
The most expensive tasks in the rendering engine are the rendering pipelines and shader compilations.
Rendering pipelines are sequences of steps that the GPU executes to render graphics. These are the steps that were produced by the Hardware Abstraction Layer.
Unlike traditional rendering engines that compile shaders (the programs that run on the GPU to process graphics) at runtime, Impeller takes a different route. It pre-compiles most of its shaders ahead of time, a strategy that significantly reduces rendering latency and eliminates the jank associated with on-the-fly shader compilation. This pre-compilation happens during the build process of the Flutter application, ensuring that the shaders are ready to go as soon as the app is launched.
(I initially wanted to talk about this topic more in-depth further down, but this would make this article way too large. If you want me to make an article about it, just tell me by leaving a comment down below!)
More Optimizations for Flutter
Impeller takes care of some other things too that optimize the rendering. They are all somewhere embedded in the layers of Impeller, but it is still important to know they exist, as they have a significant impact on the performance.
Maintaining a Small App Size while using Precompiled Shaders
We already talked about how Impeller uses ahead-of-time compilation to address the junk issue.
Now, you might wonder if having these precompiled shaders means your app will take longer to start or balloon in size. However, the Flutter team found a way to overcome this drawback.
Impeller app uses a unique technique to render graphics by relying on a simpler set of shaders than Skia. This approach helps to keep the app’s startup time low and the overall size manageable.
By using this strategy, Impeller enhances performance without compromising on quality, which is often a concern with precompiled shaders.
Anti-Aliasing
Anti-aliasing is a technique used in digital graphics to reduce the appearance of jagged edges in images, making them appear smoother and more natural to the human eye. This is particularly important in applications and games where diagonal lines and curves are present, as these can often display a stair-stepped or “jagged” look due to the square pixels that make up the screen. By subtly blending the edges’ colors with the background, anti-aliasing softens these harsh lines, enhancing the overall visual quality of the graphics.
In Impeller’s toolkit, anti-aliasing is addressed through Multisample Anti-Aliasing (MSAA), a technique known for its efficiency and effectiveness in smoothing out jagged edges. MSAA works by sampling each pixel multiple times at different positions within the pixel and then averaging these samples to determine the final color. By doing so, it blends the edges of an object smoothly with its background, reducing its jagged appearance. MSAA is optimized in Impeller, making it an ideal choice for mobile devices where performance and battery life are important factors. Despite its low overhead, MSAA enhances the visual quality of Flutter applications across a wide range of devices.
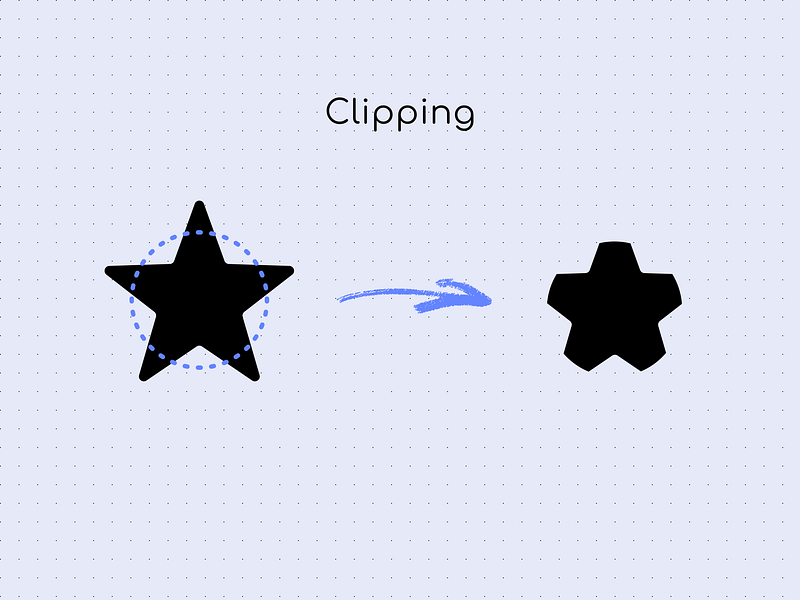
Clipping
Clipping is a technique to selectively hide or reveal parts of objects or images based on a defined boundary or shape, known as a clip mask. In the context of Flutter applications, clipping is often employed to create complex UI elements and animations, by constraining the visibility of widgets to specific areas. However, for clipping to be effective, especially in dynamic applications with frequent updates, it needs to be performed efficiently to avoid any negative impact on performance.
To overcome this challenge, Impeller utilizes the stencil buffer, a component of modern GPUs, to manage the clipping process.
As Impeller renders the visuals, it instructs the GPU to use the stencil buffer, which acts as a filter to determine which pixels should be displayed based on the clipping mask. By optimizing the use of hardware features like the stencil buffer, Impeller ensures that clipping operations are executed quickly.
Conclusion
This was a lot of knowledge.
Today we have learned what a rendering is and how it works in general, why Flutter switches from Skia to Impeller, and how Impeller works under the hood. Now you have a great understanding of the underlying rendering engine in Flutter.
I have put a lot of work into this article. If you appreciate it, I would be very grateful if you could just give this article a like! For you, it’s just one click, but for me, it means a lot more than you think!