Dio is a HTTP client for Flutter with many features. Many people like it because of its simplicity and feature-richness. Today, we will learn how to use it to enhance your app development in Flutter. Let’s get started!
Installation
Let’s start on how to install Dio. Because dio is based on Dart without Flutter, you have two options for installing it:
With Dart: dart pub add dio
With Flutter: flutter pub add dio
But did you know, that Dio has many different packages for specific use cases? Let’s explore them:
- dio_cookie_manager — A cookie manager for Dio
- dio_http2_adapter — A Dio HttpClientAdapter which support Http/2.0
- dio_smart_retry — Flexible retry library for dio
- http_certificate_pinning — Https Certificate pinning for Flutter
- curl_logger_dio_interceptor — Dio HTTP cache interceptor with multiple stores respecting HTTP directives (or not)
- dio_http_cache — A simple cache library for Dio like Rxcache in Android
- pretty_dio_logger — Pretty Dio logger is a Dio interceptor that logs network calls in a pretty, easy-to-read format.
We won’t use these in today’s article. We will focus on the basics of Dio because the main dio package already has many features.
Basic usage
To use Dio, we first have to create a variable named that uses Dio() class. Let’s do this:

Dio() has basic configurations, but you can set different options:

Request Methods
You can get a response with dio.get(), but there are many more request methods:
Future<Response> get(...)Future<Response>get(...)Future<Response> post(...)Future<Response> put(...)Future<Response> delete(...)Future<Response> head(...)Future<Response> put(...)Future<Response> path(...)Future<Response> download(...)Future<Response> fetch(...)
But now you may be asking yourself, what do I write in the brackets?
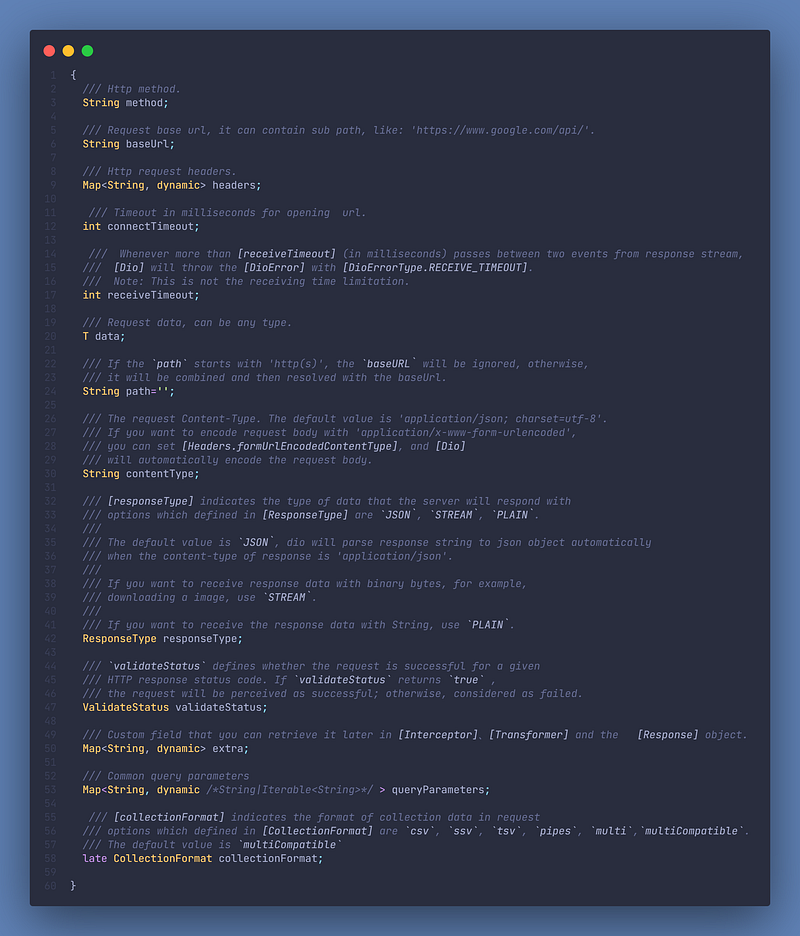
Request Options
Here is everything that you can specify in the brackets:

Response scheme
But what will you get as a response? Well, this list isn’t that long this time:

Interceptors
You can call different functions in different states of a request. You can execute something before the request is sent, when you get a response or when you got an error. Let’s see it in action:

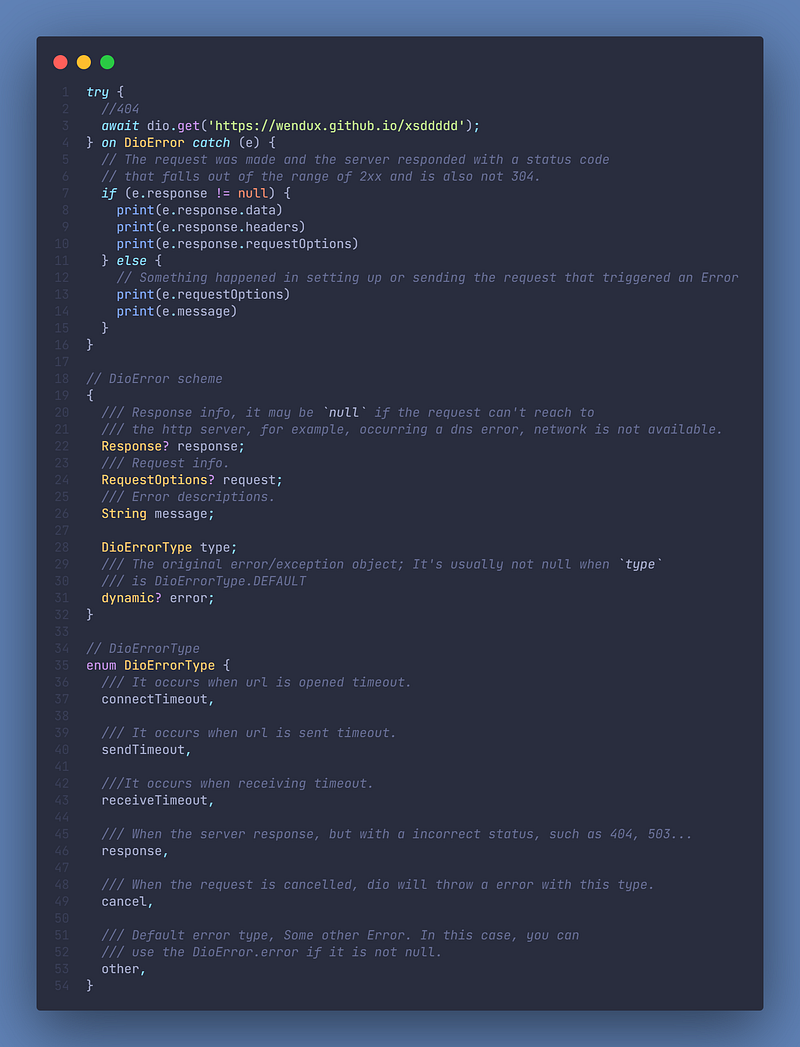
Handling errors
At last, we want to take a look at how to catch errors. We do this with a simple try-catch block:

Further reading & Conclusion
In this article, you have learned the basics of the HTTP request solution “Dio”. You have seen how easy it is to use and how powerful it can be.
You can unfold the whole power of Dio if you use packages like Freezed, Isar or Riverpod. If you want to learn these additions, I have entire tutorials about them. Check them out here.
In the following few articles, I will introduce more somewhat complicated packages and explain them (e.g. Logger). If you don’t want to miss this, I recommend you to follow me. I tried my best to write the easiest tutorial which everyone understands. If you appreciate this work, I would be very grateful if you could support this quality content and give me some claps!
Thanks for reading, have a nice day!
