Automation is one of the best things we can have as developers. That’s why it’s very important to automate tests or builds when a new pull request was created, so we don’t have to do that manually. Today I will show you how to use GitHub Actions with Flutter to create a full Continuous Integration Flow. Let’s get started!
Happy reading!
Create our basic structure
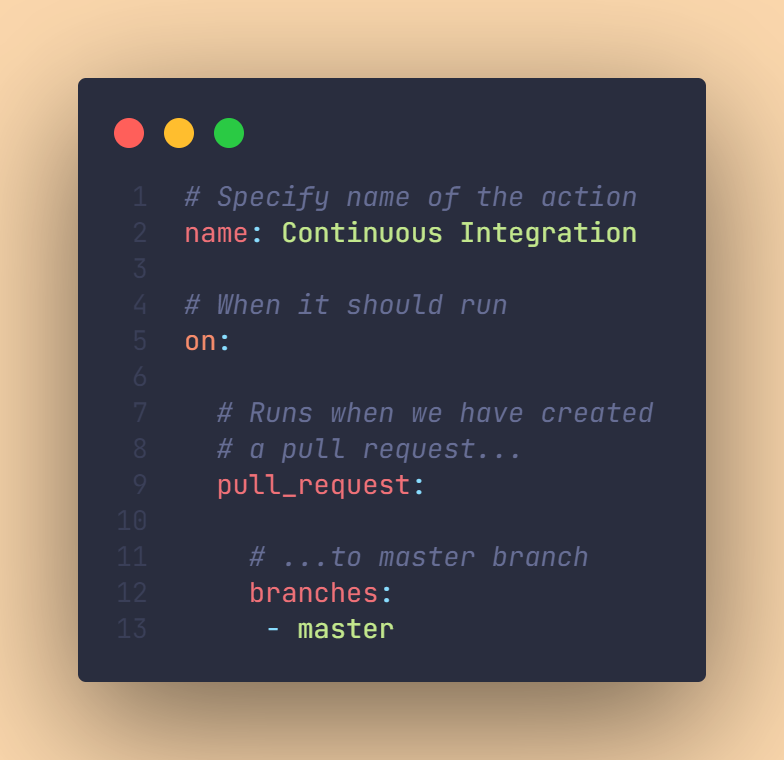
First, we go into the root of our application and create a folder called .github. Inside this folder, we create a folder workflows. Now, we create a file called ci.yml inside workflows. “ci” stands for continuous integration. ci.yml is now our first workflow. We will give our workflow a name (Continuous Integration in this example), and specify in what scenario it should run. In our example it will be on a pull request:
Create a testing job
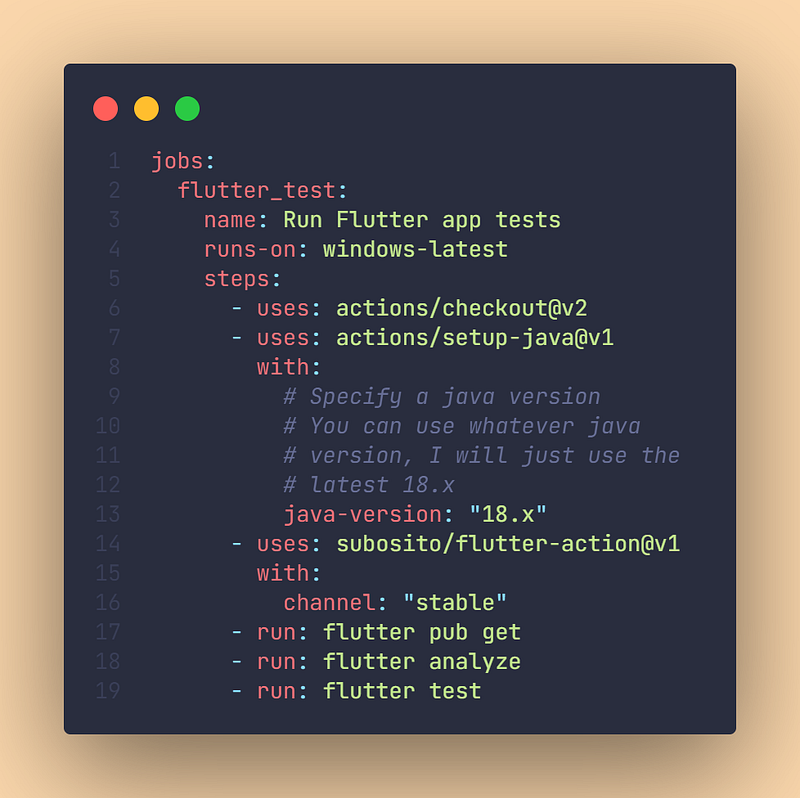
Now we want to create a job, that runs the testing of our Flutter app. In one workflow, there can be multiple jobs that can be executed. So we first have to create a job that we call flutter_test with the name Run Flutter App tests. We also have to define which operating system it should run. You can choose windows, macOS, and different Linux versions, so we will just use windows-latest.

Now we come to the fun part. We will specify the steps that the job has to do. First, we have to specify, that the job has to use actions/checkout@v2, a java setup with actions/setup-java@v1. We also have to specify the action that we use for flutter, we will use the project by subosito: subosito/flutter-actions on the master branch. With this action, we can use every flutter command we need.


So first, we just run flutter pub get, then flutter analyze and flutter test. If analyze or test fails, the whole action will fail.
If you now push that to your master branch on GitHub and create a new pull request, you should see, that it automatically runs this test. After that, you can also break your test, commit to the branch and see how the test will fail.

Advanced
You can also do different things. For example, if you want to build for iOS, you just create a new job (beneath flutter_test), call it “Create iOS Build” and instead of flutter analyze and flutter test we will run flutter clean and then flutter build ios --no-codesign. In addition to that, under “name”, you also have to add needs: [flutter_test], so we will build an ios application only if our test succeeded. You can do the same for android and other platforms as well.
Further reading & Conclusion
In this article, you have learned the basics of GitHub Actions in Flutter. You have seen how easy it is to use and how much time it can save you.
There are great Flutter packages like Freezed, Isar, or Riverpod, that will increase your productivity even more. If you want to learn these additions, I have entire tutorials about them. Check them out here.
In the following few articles, I will introduce more somewhat complicated packages and explain them. If you don’t want to miss this, I recommend you follow me. I tried my best to write the most straightforward tutorial which everyone understands. If you appreciate this work, I would be very grateful if you could support this quality content and give me some claps!
Thanks for reading, have a nice day!
Sources
GitHub Actions Documentation - GitHub Docs
*Automate, customize, and execute your software development workflows right in your repository with GitHub Actions. You…*docs.github.com
Using Github Actions With Flutter
*In this article, we will see how to use Github Actions which is a continuous integration and continuous delivery tool…*petercoding.com