
In Flutter, you can create beautiful UI. But what if you want to create very complex UI parts? For that, you need custom paint. Luckily, Flutter gives you access to low-level painting with CustomPaint. In this article, you will get a basic introduction to CustomPaint and get a handful of resources on advanced painting. Let’s get started!
Note: You can view the whole source code of this article here.
Setup
This time, you don’t have to install anything, you just have to create a Flutter app and use CustomPaint it somewhere in your widget tree. Specify size and painter, which will be TutorialPainter this time. We haven’t created this class yet but will do it soon.

Create Painter Class
Now we want to create our TutorialPainter class. This class needs to extend CustomPainter. With that, you also have to implement a function paint and shouldRepaint. Let’s do this right away:
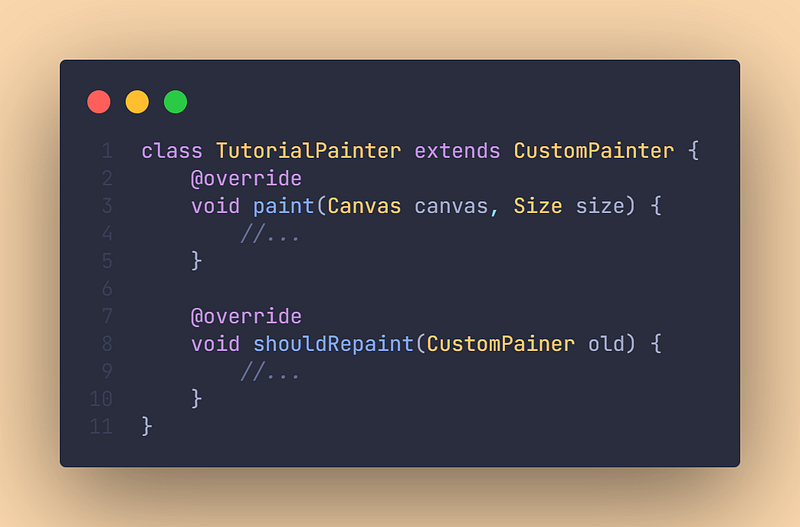
After doing this, we will care about the paint method:

Paint to the Canvas
Okay, now let’s head to our paint method and paint something. In this tutorial, we will just create a circle and I will show you which forms you can also create because this is only supposed to be a basic introduction.
We want to create a weird face like this one right here:

Image source: https://www.youtube.com/watch?v=vvI_NUXK00s
To paint a circle, we use canvas.drawCircle(). Our circle will have an Offset(75, 75)and a radius that will be 50.
We also need a rectangle. For that, we use canvas.drawRect() and have to specify a Rect there. We will use Rect.fromPoints().
In addition to that, we also need a line, which takes two Offsets as an argument. Let’s see it in action:

Here is a small list of what you can paint (Not the whole):
canvas.drawLine()canvas.drawRect()canvas.drawCircle()canvas.drawArc()canvas.drawPath()canvas.drawImage()canvas.drawImageNine()canvas.drawParagraph()
But what does this Paint() always do? It’s just a parameter, with which you can customize pretty much everything. Color, line width, border radius, etc. For all the customization options, check out this link.

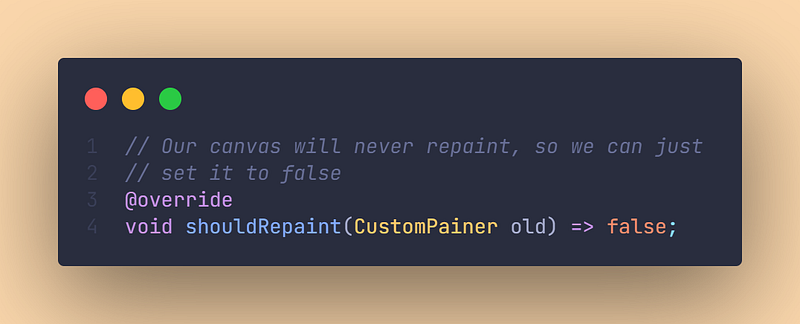
Use shouldRepaint
With should repaint you can specify when your canvas is supposed to repaint. Because our artwork will never repaint, we can just set it to true, but you can add your own logic to it if you want:
Advanced reading
If you want to learn more about painting in Flutter, I can recommend the following articles & documentation:
https://getstream.io/blog/definitive-flutter-painting-guide/
https://api.flutter.dev/flutter/rendering/CustomPainter-class.html
https://blog.codemagic.io/flutter-custom-painter/
Further reading & Conclusion
In this article, you have learned the basics of the painting in Flutter. You have seen how easy it is to use and how many things you can do with it.
There are great packages out there like Freezed, Isar, or Flutter Hooks. If you want to learn these additions, I have entire tutorials about them. Check them out here.
In the following few articles, I will introduce more somewhat complicated packages and explain them. If you don’t want to miss this, I recommend you follow me. I tried my best to write the most straightforward tutorial which everyone understands. If you appreciate this work, I would be very grateful if you could support this quality content and give me some claps!
Thanks for reading, have a nice day!
NOTICE: This article is based on the documentation of Flutter. All the information provided here is from flutter.dev site and a big part of the source code is taken from the documentation. Used websites in this article:
https://api.flutter.dev/flutter/widgets/CustomPaint-class.html
https://api.flutter.dev/flutter/rendering/CustomPainter-class.html