
Dart Frog is an excellent tool for building a backend with Dart. I’ve already covered the basics in this article, so if you want to follow along, I recommend you read this one first. But come on, we want to dive deeper into Dart Frog. Let’s look at Dependency Injection, Testing, Serving Static Files, and Custom Server Entrypoint. Let’s get started!
Happy reading!
Note: You can find the whole source code provided in this tutorial here
Dependency Injection
In the last article, we have seen how to use middleware to execute code before and after the request is processed. But did you know that you can inject dependencies on that go? You can, and it is extremely easy!
What is a provider?
So first, we have to understand what a Provider is. Provider is exactly the thing we have to use to inject the dependencies. It provides us an instance of type T. To access the value, you can use RequestContext what you have to provide in your onRequest function. Great, now we know what providers are. But how can we use them?
Inline & Extracted Provider
There are two ways in creating a provider. Inline and extracted.
Let’s first take a look at inline:

This is great and nice, but in more complex cases, it can get a little bit tricky. That’s why we can extract providers. The advantage of this is, that you have your code separated better, but you can also use this provider in multiple middlewares. That’s neat, right?
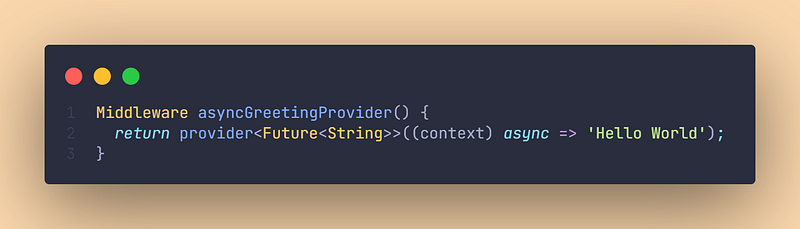
Okay, so let’s create your greetingProvider.

As you can see, this is extremely easy! Now we can use our greetingProvider in our middleware with handler.use():

Use asynchronous values
Now, let’s see how we can use asynchronous values. It’s very easy. Instead of having a provider of type T, we just have a provider of type Future<T> and add the async keyword.
We can call this provider exactly as before with handler.use.
We have learned how to create the provider, but how can we access it now?

Accessing the provider in onRequest
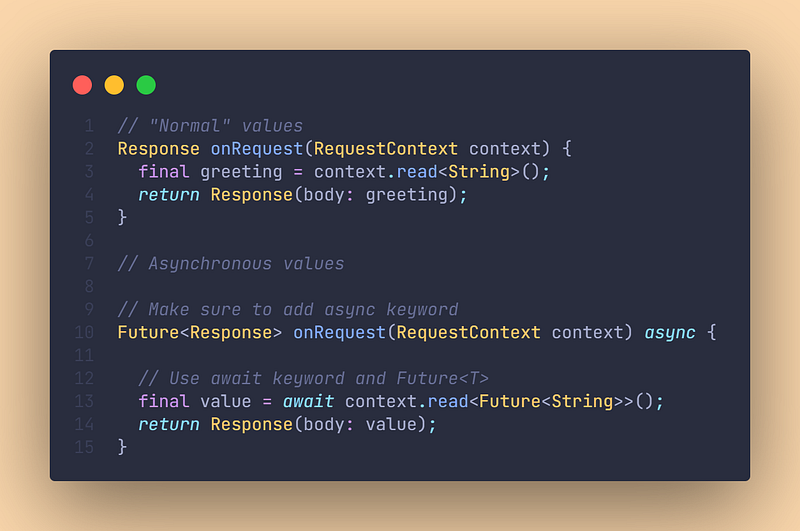
As always, accessing a provider is as easy as everything else. just use context.read<T>() and you are done. You can also access future values with await context.read<Future<T>>(), but make sure to add async keyword to your function:
Unit Testing
Testing our application is essential for production mode. But how do we do this in Dart Frog? It’s quite easy. If you don’t know how to do unit testing in the first place, take a look at this article before continuing! Now let’s get back to unit testing in Dart Frog. To be honest, the documentation lacks a little bit there, because the code provided is explained well. That’s why I will use the code provided in the documentation and explain it in a detailed way!

Serving static files
Okay, now let’s see how we can use static files. Create a new directory in your project called public. Now, put a file inside of it, for example dog.png. If you now go into your browser and type localhost:8080/dog.png, you will see this image. Great, right? But what about a more structured way? What about having your static files structured into a text folder, image folder, and maybe a gif folder? That’s not a problem at all. public directory can also have subdirectories. So if you want to access dog.png via localhost:8080/images/dog.png, just put the dog into public/images/dog.png and it works. Great, right?

Custom Entry point for custom directory
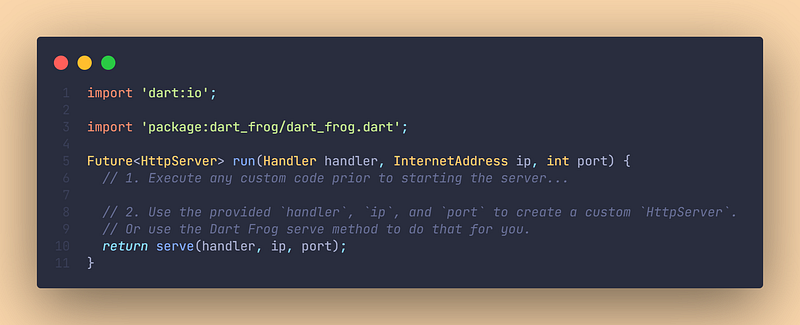
If you want to have a custom directory other than public, then you have to create a Custom Entrypoint. These are used when you need fine-grained control over server initialization or if you want to execute code before starting the server. To create a custom entry point, create a top-level run function in your main.dart of type Future<HttpServer>. This function takes 3 arguments: Handler, InternetAdress and int for the port.
Inside of this function, you can run code before starting the server and after that, you return a custom HttpServer with the arguments specified before or use Dart Frogs serve method:
Okay, now we know, how to create a custom entry point, but how do we specify our own directory now?
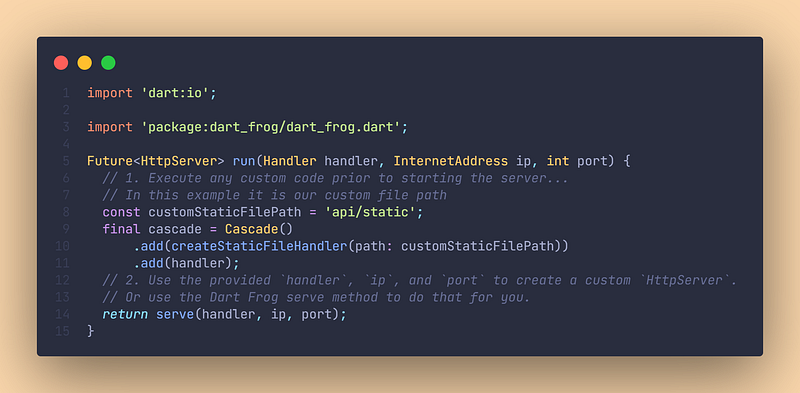
It’s very easy. We will write custom code that executes before starting the server. First, we specify our custom file path. Now we can use Cascade to create a static file handler.
That was easy, right?
Custom Entry Points
We have discussed everything about Custom Entry Points in the above section “Custom Entry point for custom directory”. So if you want to learn how to use Custom Entry Points, just look at this example :)
Further reading & Conclusion
In this article, you have learned the basics of the backend framework “Dart Frog”. You have seen how easy it is and how much you can do with it.
You can unfold the whole power of Dart Frog if you use packages like Freezed, Flutter Hooks, or learn testing. If you want to learn these additions, I have entire tutorials about them. Check them out here.
In the following few articles, I will introduce more somewhat complicated packages and explain them. If you don’t want to miss this, I recommend you follow me. I tried my best to write the most straightforward tutorial which everyone understands. If you appreciate this work, I would be very grateful if you could support this quality content and give me some claps!
Thanks for reading, have a nice day!
NOTICE: This article is based on the documentation of the Dart Frog package. All the information provided here is from this site and a big part of the source code is taken from the documentation. Dart Frog Documentation Source: https://dartfrog.vgv.dev/